Introducing CrowdTrak! #
Elevate your event experience with our all-in-one solution. Track, monitor, report, and manage attendance effortlessly. Ensure instant and accurate records for tickets, safety, catering, CPD, sponsored sessions, or mandatory sessions. With CrowdTrak, use your device to scan or let attendees check themselves in.
Effortlessly generate, analyse, and act on real-time statistics, empowering you to optimise your event at every step.
Please contact your account manager to discuss options to enable this feature.
On-Site Attendance Tracking on the CMS #
To begin managing your onsite attendance tracking, log in to the CMS and select the desired app CrowdTrak has been enabled on.
Once within the app on the CMS, navigate to the left side navigation menu and select the ‘On-Site’ tab. In the secondary menu you will be able to see the ‘Attendance Tracking‘ section and the subsequent features.
Attendance Trackers Tab Overview #
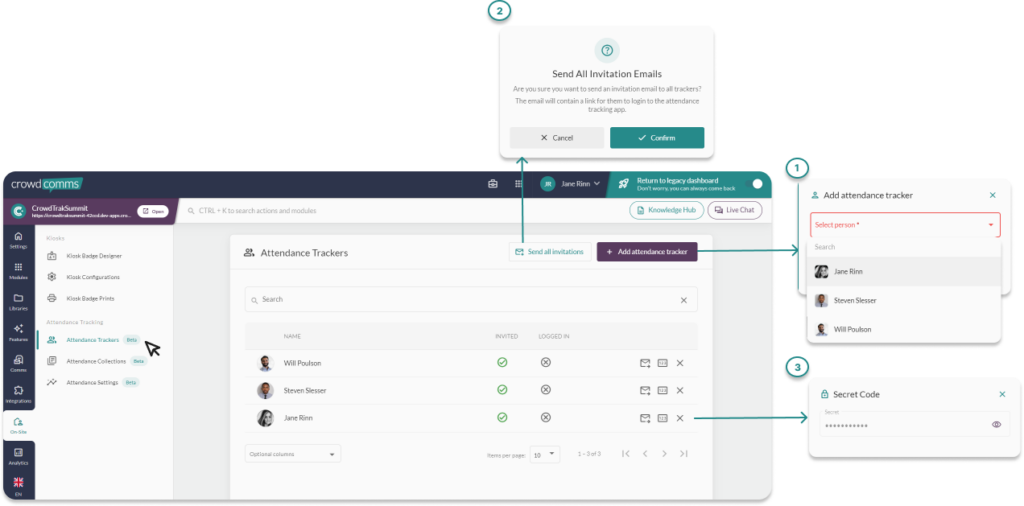
Within the ‘Attendance Trackers Tab‘ you will be able to manage event staff access to the CrowdTrak web application.
- Add an ‘Attendee Tracker‘ from the People Library via this button, shown at fig. one above. For more information on People Library Management please see here. Once you have added all the people to the Attendee Trackers, you will see them reflected in the table, where you can search by name and view invite and login status details. From the option columns dropdown you can also check when someone was last invited, and when they last logged in.
- From the second button flagged above, you can invite all your Attendee Trackers in bulk to log into the App and begin scanning. You can also invite them individually via the envelope icon in the table. Clicking either of these buttons will issue an email invitation with a link to the web application and a secret code which they will need to login. They will also need the short code of the app to login, which is the name of the event app in the email.
- You can view an Attendee Trackers secret code in the CMS by selecting the numbered box icon in the table next to their name. You can revoke their access by clicking the X icon.
Attendance Collections Overview #

Setting Up Scanning for Sessions #
Before you can begin scanning you will need to create some Attendance Collections to store your scanned data. First, head over to the Attendance collection tab. If you have sessions in your agenda already, these will be automatically be set up as collections. Please note: only badges scans will be possible on these sessions, if you wish to scan tickets you will need to set up a separate collection.
If you would like to set up a collection, select the ‘Add Attendance Collection’ button outlined above.
- In the pop up modal you can name your session and set the start/end date and time. Once configured, select submit to see your session populate in the table. You can edit the name, collection type and date or time by selecting the pencil icon next to the session in the table. To delete a session select the bin icon.
Setting Up a Ticket Scanning Collection #
To begin consuming tickets with QR codes, you will need to create some Attendance Collections to store your scanned data. Firstly, head over to the Attendance collection tab. If you have sessions in your agenda already, these will be automatically be set up as collections. If you would like to set up a new collection for tickets, select the Add Attendance Collection button outlined above.
- In the pop up modal you can name your Ticket Collection, and set the start/end date and time. Once configured select “submit” to see your session populate in the table. You can edit the name, date or time by selecting the pencil icon next to the session in the table. To delete a session, select the bin icon.
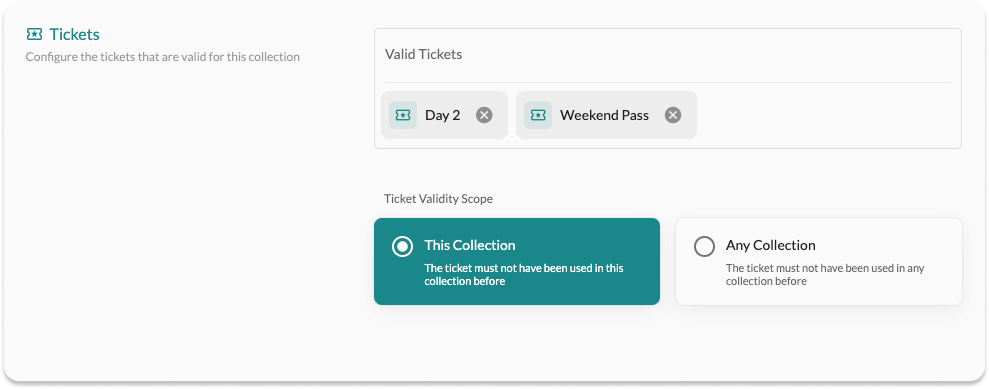
- To add tickets that will be accepted to the collection, select the pencil icon on your newly created collection, and in the Edit Collection page navigate to the Tickets section. Use the drop down to apply the relevant tickets. Set the Ticket Validity Scope and Save Changes.
- For more information on creating tickets with QR Codes please see here.
Attendance Tracker Settings #
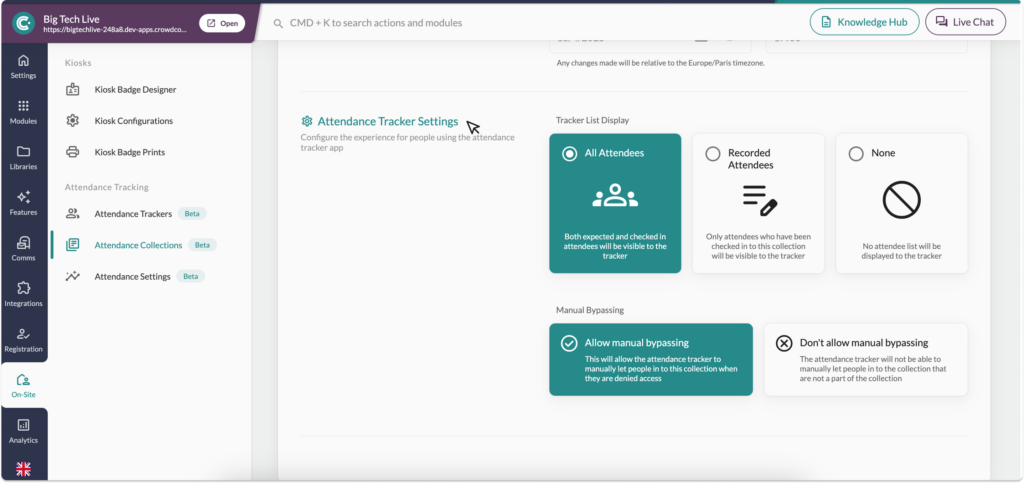
At the bottom of the Edit Attendance Collection page, you will find the Attendance Tracker Settings section. Here you can configure some of the Apps display settings regarding the attendee list.
- All Attendees: Will display two separate lists you can easily toggle between to see who has checked in and a second list of who is yet to arrive.
- Recorded Attendees: This setting will show you one list of attendees who have already checked in.
- None: There will be no attendee list displayed in the Attendance Tracker App.
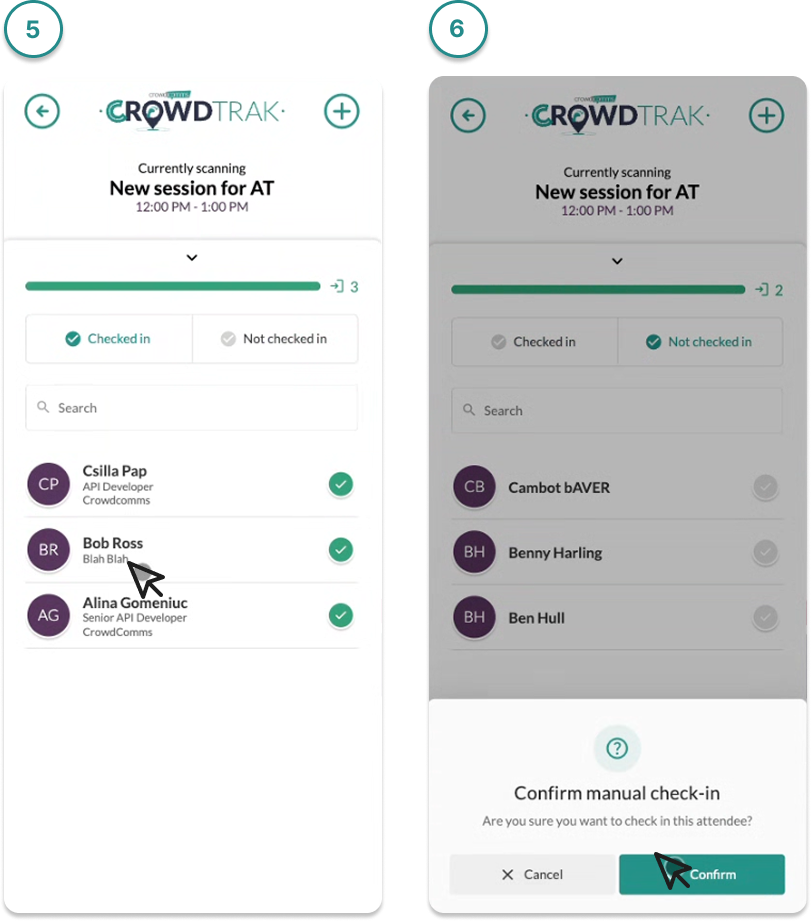
Manual Bypassing can be used on Badge collections only at present, this feature allows you to scan a persons badge and then manually add them to a collection via the App on the day of the event.
Review Scanned Sessions and Tickets #
To review the scanning data after a session, select the arrow icon next to your chosen session in the table. This will navigate you to a new page where you can view:
- Number of Attendees
- Expected Numbers
- Attendance Rate – please note if attendees use the manual bypass feature the attendance rate will go above 100%
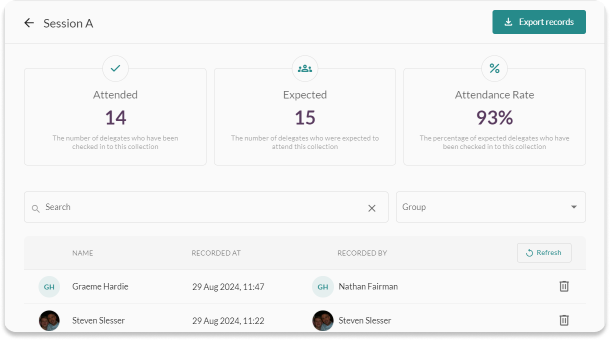
There is also a table listing all scanned attendees, which is searchable by name and can be filtered by group. The button on the top left ‘Export records’ with export an Excel report for this session. The Excel includes:
- Attendee First Name
- Attendee Last Name
- Attendee Email Address
- Groups they are in (if applicable)
- Bypassed Checks
- Time of scan recording
- Recorded by
Attendance Settings Tab Overview #
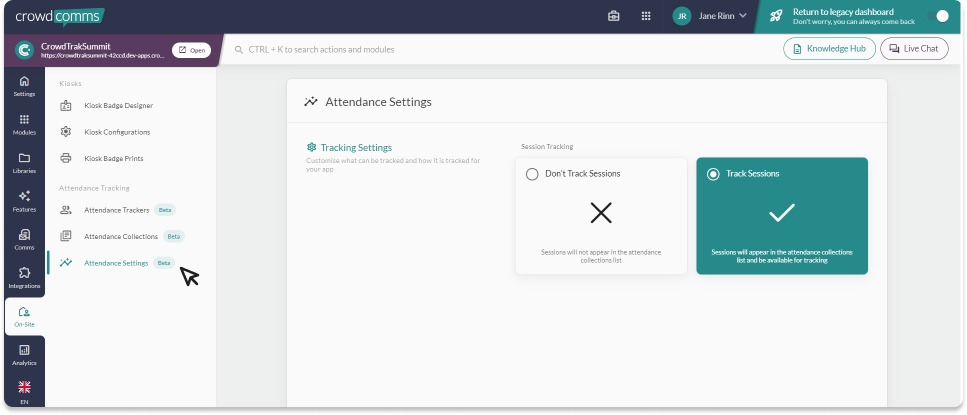
From the Attendance Settings tab you can toggle the feature on/off.
Please note: disabling session tracking will remove all attendance data for historical sessions. The data will not be recoverable.
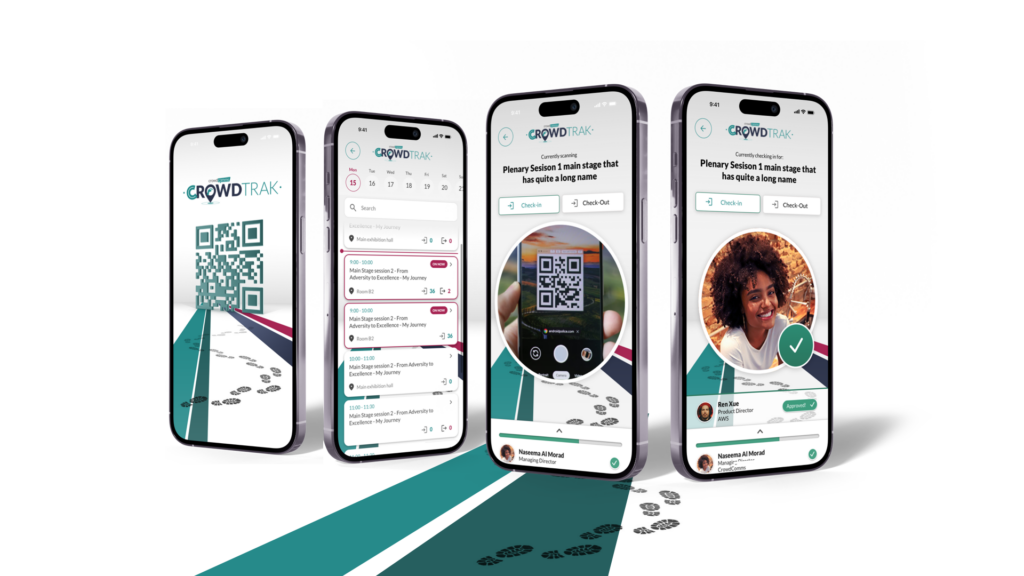
CrowdTrak App Overview #
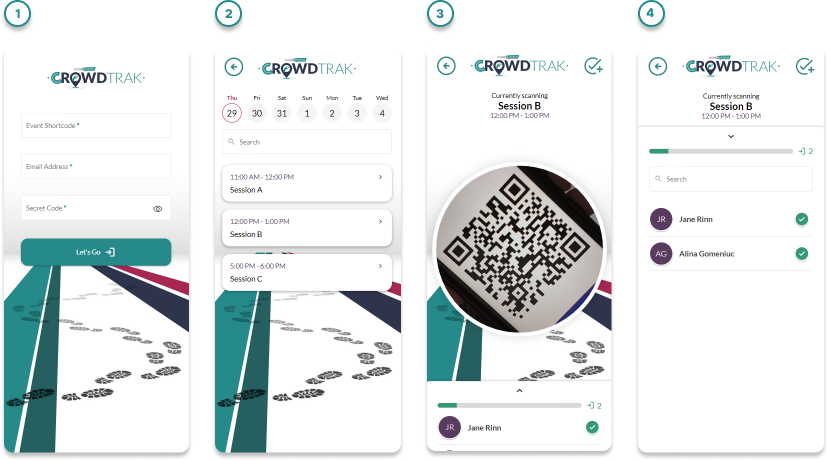
The above image shows the application interface an Attendee Tracker will use. Please see the video at the start of this document for a demo of the app in action!
- Login Screen
- List of Attendance Collections, searchable through the search bar and via the date picker.
- The search bar will search sessions on a chosen day.
- The date picker will show the next 7 days from the current day when you open the app.
- Scanning a QR code for a particular collection, on this screen you will also be able to flip between front and rear view camera and toggle on/off your torch on mobile.
- List of scanned delegates for a collection.
- List of attendees when show all attendees is enabled.
- Manual Bypassing when bypassing is enabled.