1. Firstly, you will need to log into your CrowdComms Content Management System (CMS) Dashboard and input your details.
2. Upon successful login, select the Event App where you would like Business Cards applied.
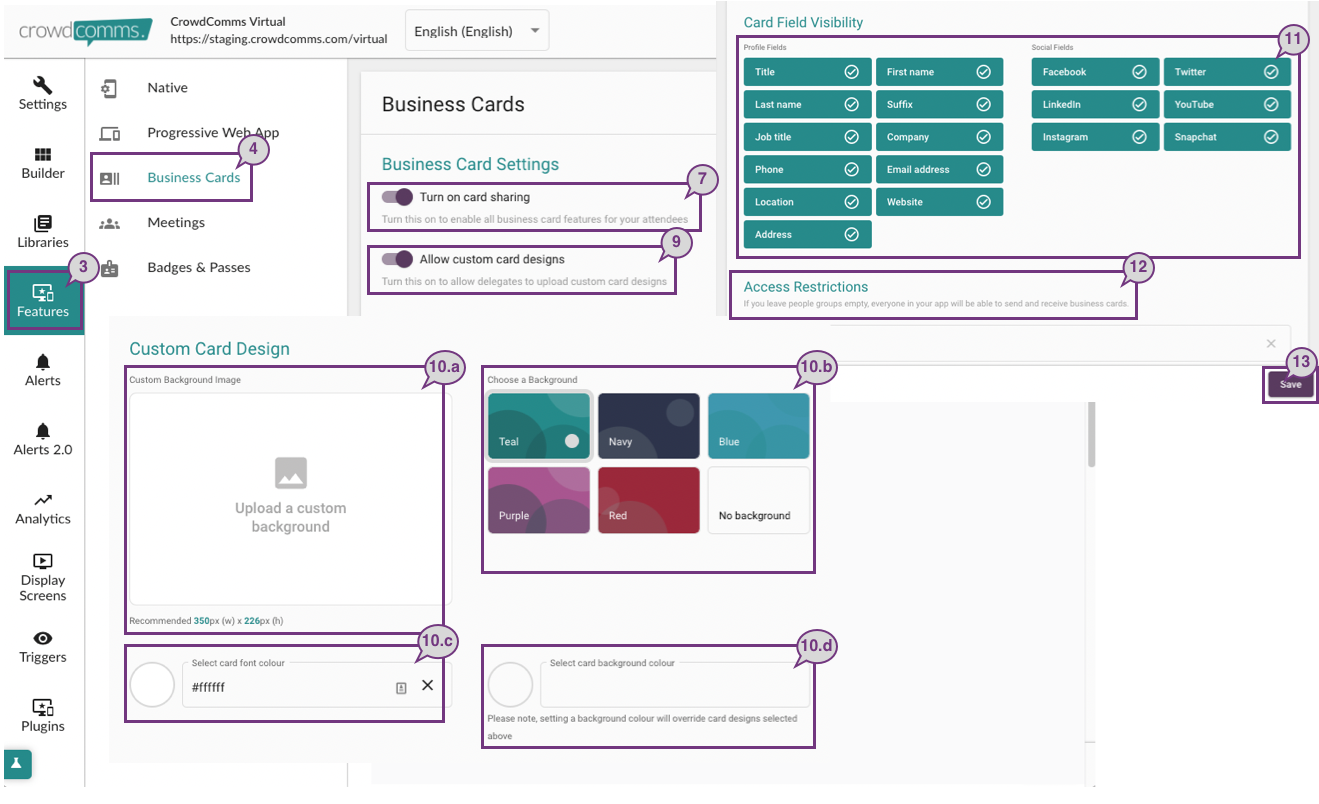
3. Then click on ‘Features’ from the left-hand menu.
4. Click on ‘Business Cards’ that appear as an option in the secondary menu to the right.
5. On this page, there are several sections for you to populate and they are the settings, card design, personal details fields visibility and access restrictions.
6. Under Business Card Settings there are two toggles which you can set.
7. If you switch on the ‘Turn on card sharing’ toggle, your delegates will be able to exchange cards with one another and drop their cards at the Company pages.
8. If they are at a physical event, they will be able to scan other delegates’ cards and be able to have their card scanned by other delegates to initiate an exchange.
9. If you switch on the ‘Allow custom card designs’ toggle, your delegates will be able to upload custom card designs to be used as their business card’s background.
10. In the Custom Card Design section, you will be able to:
a. Upload a custom background image – If you upload an image, this image will appear on your Event App for your delegates to see and use as their business cards’ background.
b. Template background – If you select one of the template backgrounds, it will become the default background for your delegates on your Event App.
c. Card font colour – Once you’ve uploaded a custom background image, you can choose the font colour by clicking on the circle. To choose a colour, you can either enter the Hex code or use the colour and shade sliders.
d. Card background colour – If you wish to have a simple block colour background you can do so by clicking on the circle. To choose a colour, you can either enter the Hex code or use the colour and shade sliders.
Please note that setting a background colour will override card designs selected either from the custom design or the template background image.
11. In the Card Field visibility section, you can select which profile or social fields delegates can choose to appear on their business cards. For example, if you don’t want your delegates to be including their Company’s name in their business card, you can de-select ‘Company’ from the field’s visibility.
12. The last section is the Access Restrictions field. If you want to restrict this feature to only certain group(s), you will need to add the group names in this field. Otherwise, leave this field blank to allow everyone in your Event App to be able to use the Business Cards feature.
13. Don’t forget to click ‘Save’!


