Overview #
Effortlessly connect your event data from the CrowdComms CMS to Microsoft Dynamics CRM with this new integration tool.
Now in Beta, this integration enables smooth, automatic synchronisation between platforms eliminating the need for manual data entry. By linking your Microsoft Dynamics account, you can streamline attendee management, keeping your records accurate and up-to-date across both systems.
Key Capabilities Include:
- Effortless Connection: Easily link your Dynamics account with our CMS through a dedicated integration tile, featuring a streamlined setup process.
- Customised Data Mapping: Tailor the integration to your specific needs by mapping Dynamics field keys to People Library profile fields, custom fields, allowing you to keep contact details up to date while also recording badge prints and session check-ins!
- Dynamic Group Management: Leverage the power of dynamic groups to automatically segment your audience based on Dynamics data. Create or utilise existing groups based on dropdown and checkbox selections, ensuring precise targeting.
- Automated Contact Creation: Seamlessly integrate user details with Microsoft Dynamics to ensure every new contact is instantly captured and organised.
To access this feature, please contact your account manager to have it enabled.
Part 1: Setting up the Connected App in Dynamics #
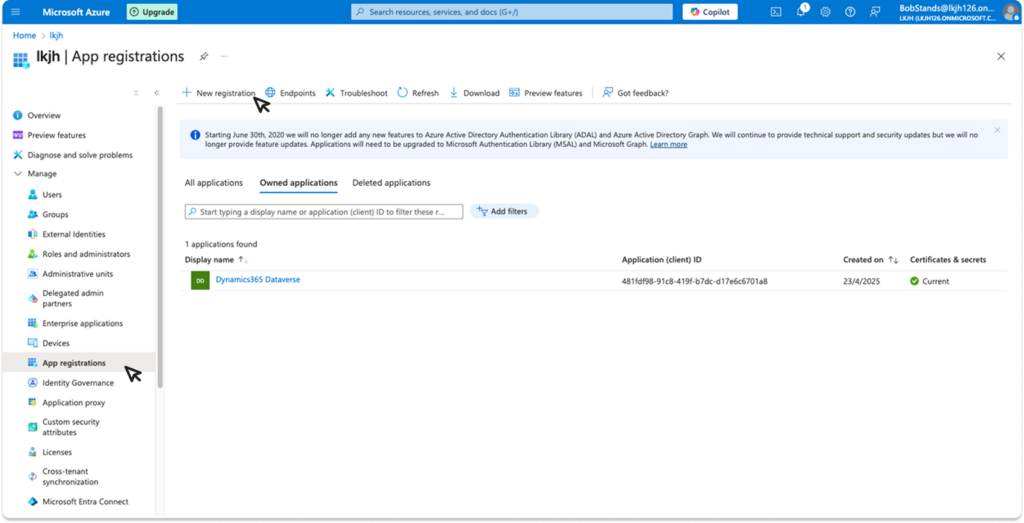
- To begin setting up this integration, you will first need to create a connected App in Microsoft Azure Entra ID. Login to Azure and open the Entra ID environment where your data resides. Navigate to the left side menu, select the Manage drop down, and within the secondary menu select App Registrations > New registration.
Fill out the form as follows,
Name field: can be anything you prefer
Supported Account type: select Accounts in this organisational directory only (<org> only – Single tenant)
Redirect URI: Do not fill in the redirect URI
Once you have completed the form, select register.
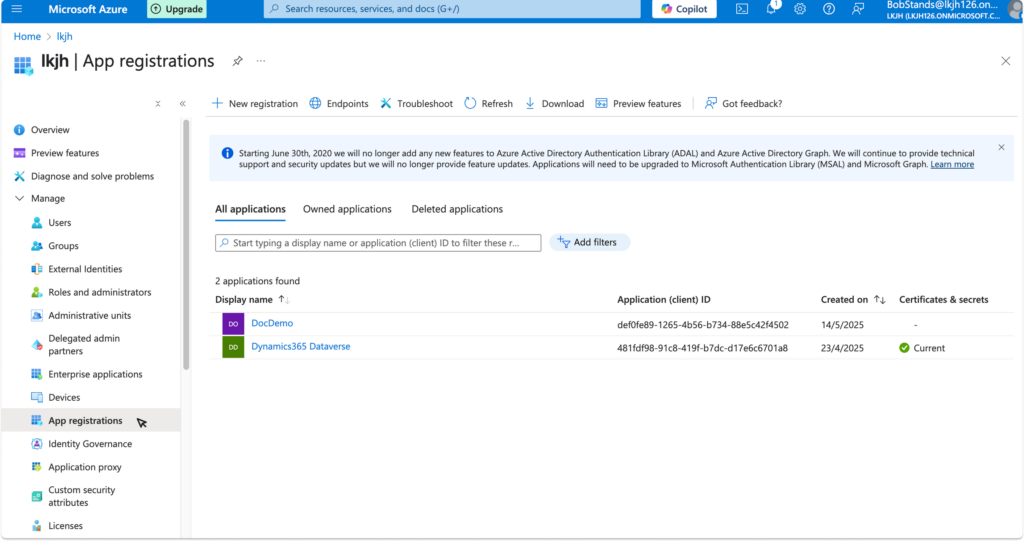
Next, go to the left-hand menu and navigate to Manage > App Registrations. In the window, click All Applications, select the app you just created, then choose API Permissions from the left-hand menu.
Click Add a Permission.
Find and click Dynamics CRM.
Make sure Delegated Permissions is selected.
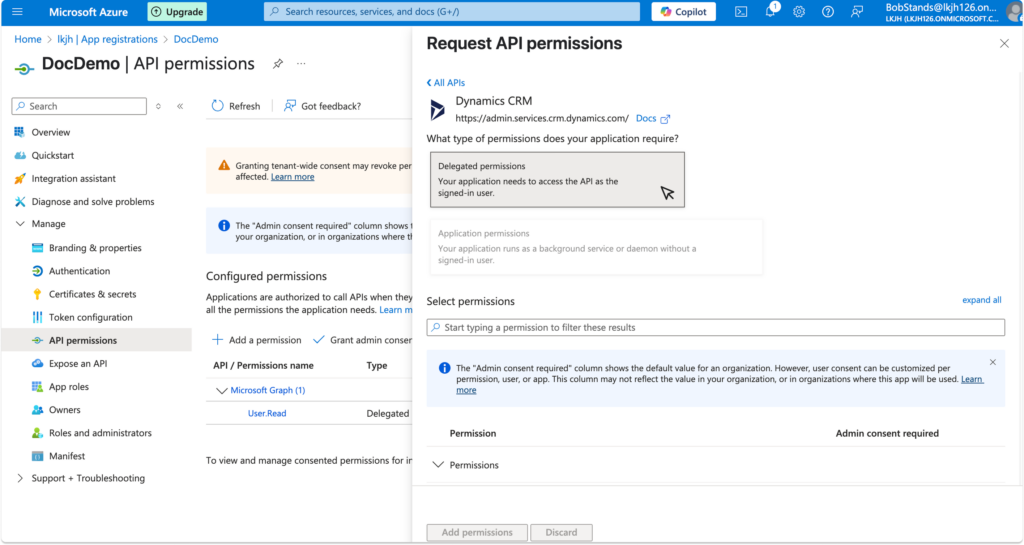
Check user_impersonation in the permissions drop down.
Then click the Add Permissions button on the bottom left.
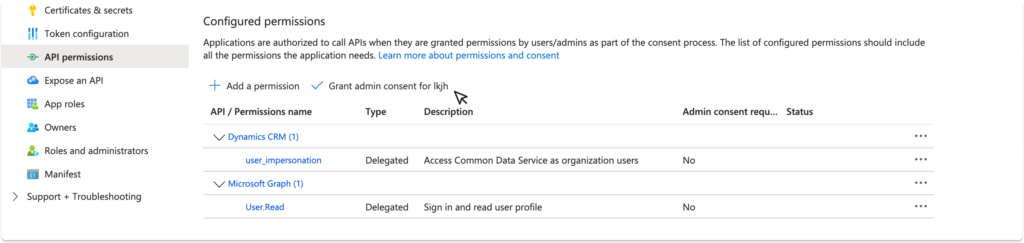
Finally, click Grant admin consent for <org>
Part 2: Making sure the Correct Environment is Selected #
It’s recommended to perform this configuration within the same environment where the data resides.
Please note that the user applying these changes must have the necessary permissions to make edits in that environment.
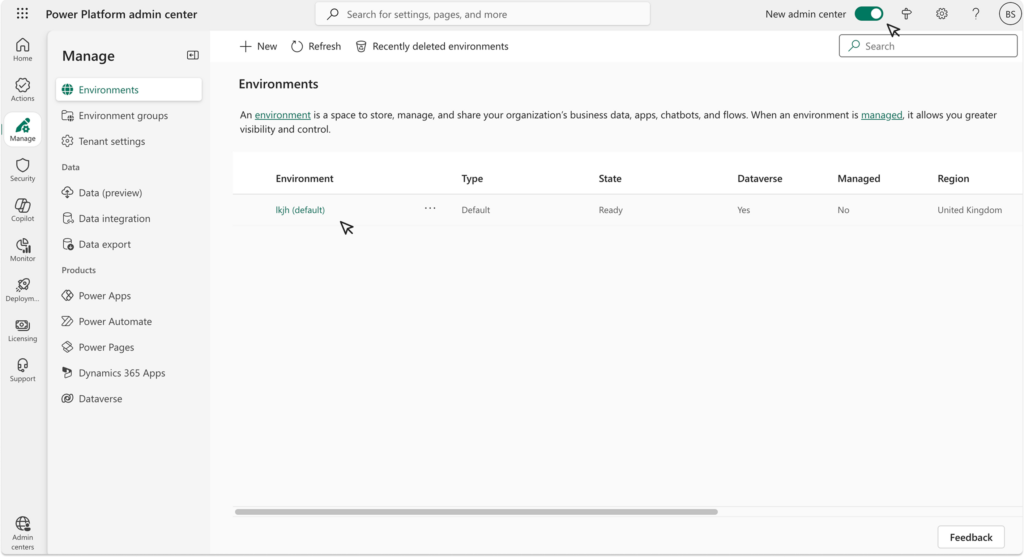
Head to the Power Platform admin center and ensure you have the New admin centre toggled on as shown below.
Note that this toggle may not be present in the future.
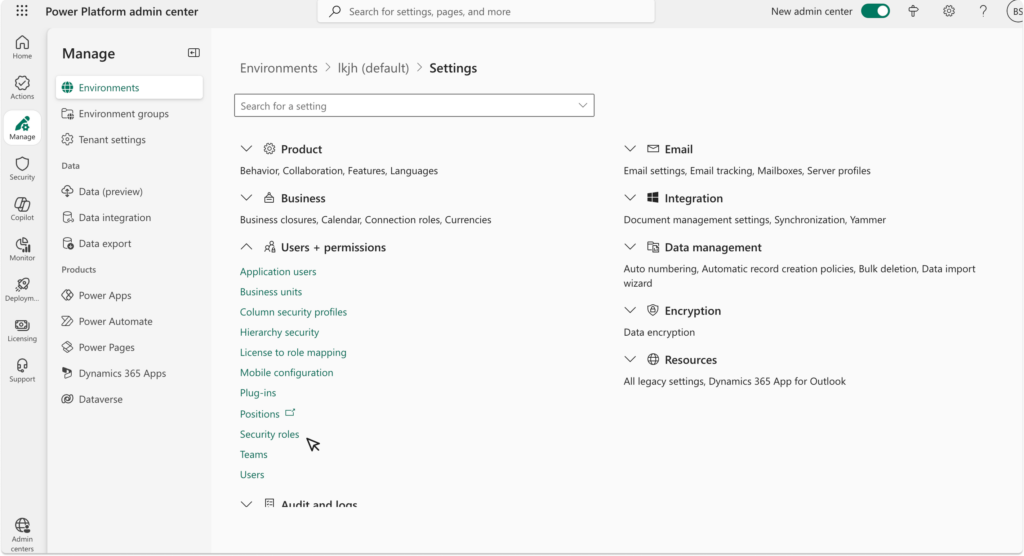
- Select the environment where you configured your connected app in part one.
3. In the top menu bar navigate to Settings > Users + permissions > Security roles > + New role
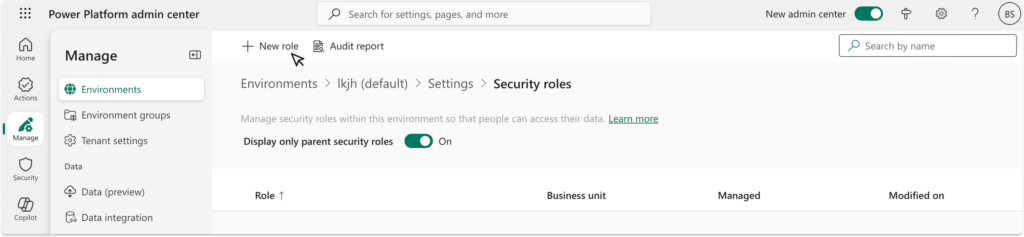
4. Fill out the form as follows, and Save.
Role Name: Choose something relevant to the integration. E.g CrowdCommsIntegration
Assign the expected Business Unit
Members Privilege Inheritance: Select Direct User (Basic)
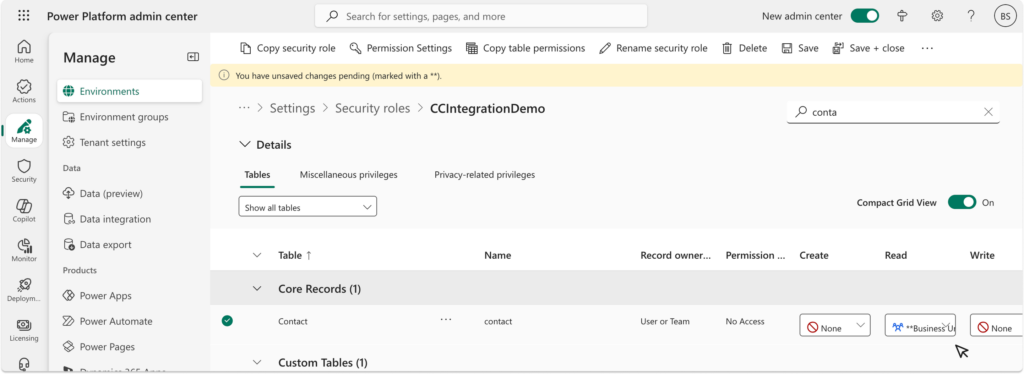
5. You will then be redirected to a Security Roles table for the role you created. Search for Core Records and within that search the Contact table.
6. Select the radio button on the contact table and set Read to be at Business Unit. Others can be selected if a different scope is required.
7. Save changes and navigate back to the settings page.
8. In settings, select Users + permissions > Application users, and select the + New app user button on the top toolbar menu.
9. Fill out the form as follows:
Select the App created in the prior section within Microsoft Entra ID in part one.
Select the same business unit provided for the role earlier in part 2 step 4.
Add the role created in step 4 too.
Note, at this point errors may appear if the user making the changes doesn’t have the required permissions.
10. Once you are happy with you selection select Create.
11. Navigate back to the Power Platform Admin Centre, select Manage>Environments and choose the required Environment. Ensure Dataverse is enabled on the details screen. If it is not enable you will need to set this up.
Part 3: Obtaining the Credentials for the CrowdComms CMS #
- To connect your data to the CMS, you’ll need a Base URL, Client Secret, Client ID, and Microsoft Tenant ID. The Tenant ID, Client ID, and Client Secret can be obtained from the Entra ID portal. The Base URL can be retrieved from the Power Apps panel once a Dataverse database or endpoint has been added.
Client Secret:
Within the Azure portal navigate to Entra ID.
Then navigate to the application setup within the Microsoft Entra ID section, head over to the left side menu to Manage > App Registrations > [YOUR APP NAME]
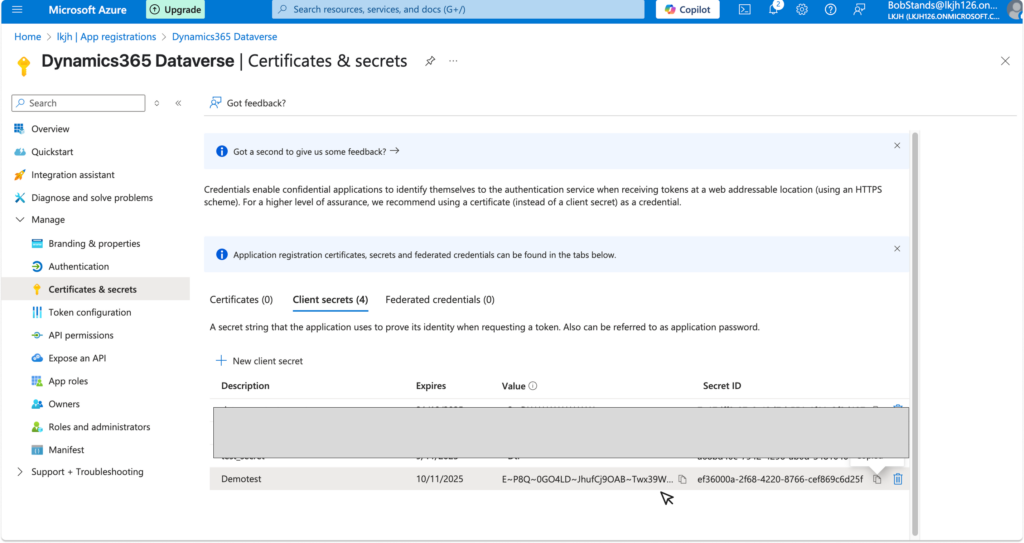
Continue to Manage > Certificates & secrets > Client Secrets
From here, create a new secret via the + New client secret button, located above the table, and follow the on screen instructions.
Once created, the new secret can be found at the bottom of the table. The secret can then be found within the Value column pointed to in the below image.
Please Note that it cannot be looked at again after leaving the page, so best to copy to your clipboard or a notebook.
3. Client ID
Within the Azure portal navigate to Entra ID
- Then navigate to the application setup within the Microsoft Entra ID section, and head over to the left side menu to Manage > App Registrations > [YOUR APP NAME]
Within the Essentials information at the top of the page, you will find the Application (client) ID section, which is the client id for you to use.
4. Microsoft Tenant ID
Within the Azure portal, navigate to Entra ID
On the overview page, you will find a section stating the Tenant ID and a copy button to use.
5. App(Base) URL
Open your Power Apps account and check the same environment is selected as the one configured in earlier steps. You will see this on the top right toolbar.
Within the top bar, click the settings cog.
Followed by clicking the “Developer Resources” text.
From here you can fetch the URL from the Web API Endpoint section and truncate the url segments from it. ie on this demo test it is
https://orgad976495.api.crm11.dynamics.com/api/data/v9.2however the/api/data/v9.2needs removing. yours will be different depending on your naming conventions.
Part 4: Setting up your Integration in the CMS #
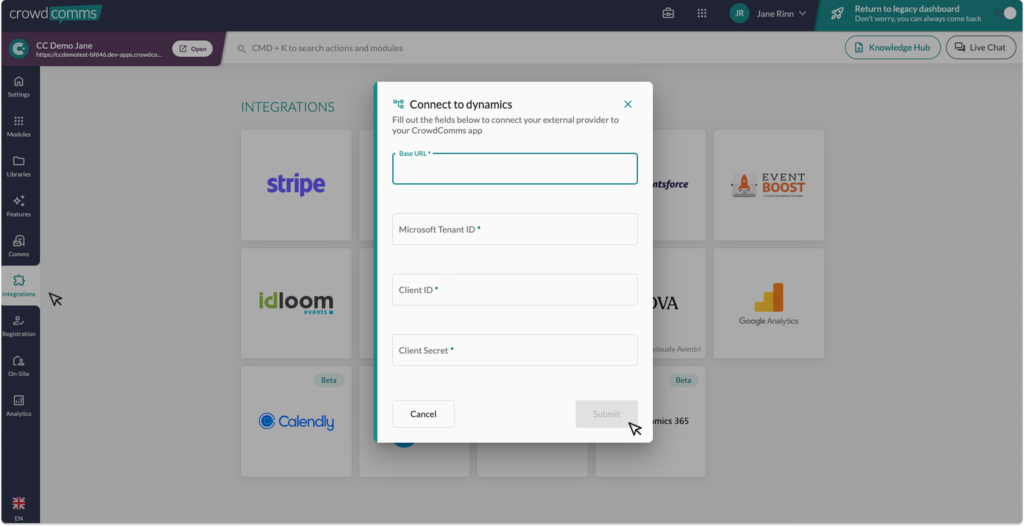
- This section may need to be enabled by a staff member before you can proceed. Log in to the CrowdComms CMS and select to edit your event app. Within the app, select the Integrations tab and then the Dynamics tile.
- Upon clicking the tile you will be presented with a form enter the details you gathered in the previous section to the form, then click submit.
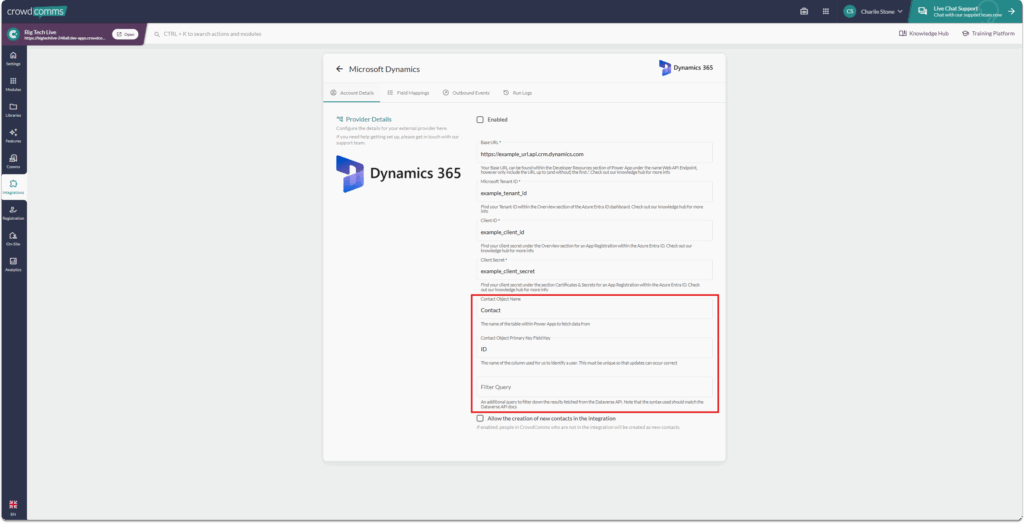
3. You will now be redirected to the settings of your integration. There are three fields in the bottom of this section. Contact Object Name, Contact Object Primary Key Field Key and Filter Query.
- Contact Object Name: Is the name of the table found within powerapps that will house the attendee data to be synced, with the default being
contactswhen left empty - Contact Object Primary Key Field: Is the logical name of the column for the Id used for us to track what person in our library belongs to what entry within the Dynamics CRM, with the default being
contactid - Filter Query: A field that allows the selected table to be narrowed down instead of pulling in all of the attendee information it will pull in the information matching the filter, as mention the default is empty which will lead to all attendees being synced. Refer to the dataverse API documentation for how to write the filters.
Leave these blank unless you have a more complex table configuration. If so, please reach out to a staff member and our dev team will be happy to assist.
4. Select the checkbox ‘Allow the creation of new contacts in the integration’ if this is enabled people/contacts in CrowdComms CMS who do not already exist in your external CRM will be created in your CRM.
Part 5: Field Mappings #
You are now ready to begin mapping your fields from Dynamics into the CMS.
You can read more about field mappings here: Integration Entity Mapping
Part 6: Outbound Events #
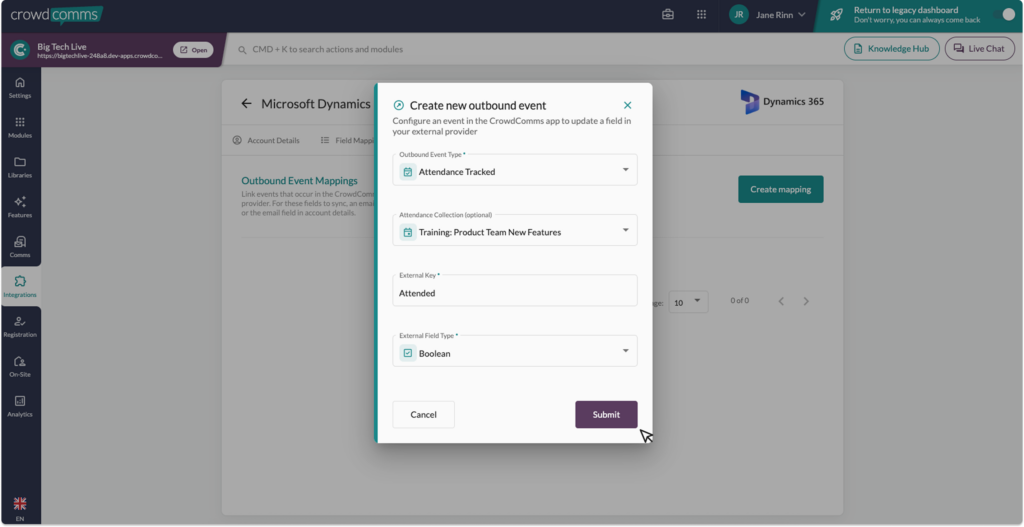
Outbound Event Mappings link events that occur in the CrowdComms system to specific fields in your external CRM. To enable syncing, an email field must be mapped.
- Navigate to the Outbound Events tab within the Integration page.
- Select the Create Mapping button.
- In the drop down, select from one of two event types:
Attendance Tracked: Update a field in your external provider when a delegate checks in to a session.
Badge Printed: Update a field in your external provider when a delegate prints a badge
- Enter the External ID captured from Dynamics (see step 2 in part 5 of this guide to see where to find this ID in Dynamics). Select the External Field Type, this will be what is entered into Dynamics, you can choose between:
- A Boolean: Writes True or False to the external CRM.
- Date Time: Writes the date/time of the event.
- Please note you will need to have Kiosks or Attendance Tracking enabled to use this feature. Please speak to your event manager to set this up.
- To activate the sync to automatically begin to run, navigate to the account details tab, and select the check box to enable the integration, and Save Changes. The integration will fail to run if you have entered an External Key that does not exist in Dynamics. Syncs should happen at intervals of 30 minutes on a predetermined schedule.
Run Logs #
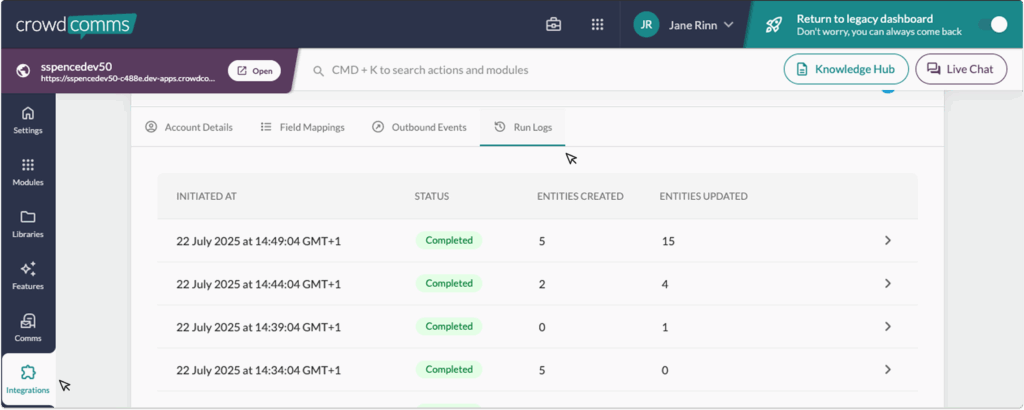
Run logs are available within the CMS in your integration configuration settings. Simply select the Integrations tab on the left side menu, select your integration, if your integration is set up you will be able to navigate to Run Logs.
The Run Logs will show you information on the latest sync of the integration. You can view how many entities were created, how many entities were updated and the time and date of each sync or ‘run’ of your integrations.
Please Note #
- Contact sync is limited to 2,000 records. If you anticipate needing more, reach out to support for assistance.
Should you need any assistance with this integration, please don’t hesitate to reach out to a member of the support team on Live Chat available via the CMS.


