Overview #
Effortlessly connect your event data from the CrowdComms CMS to Marketo with our integration tool.
Now in Beta, this integration enables smooth, automatic synchronisation between platforms, eliminating the need for manual data entry. By linking your Marketo programs, you can streamline attendee and registrant management, keeping your records accurate and up-to-date across both systems.
Key Capabilities Include:
- Effortless Connection: Easily link your Marketo account with our CMS through a dedicated integration tile, featuring a streamlined setup process.
- Customised Data Mapping: Tailor the integration to your specific needs by mapping Marketo field keys to profile fields, custom fields, or dynamic groups within our CMS.
- Dynamic Group Management: Leverage the power of dynamic groups to automatically segment your audience based on Marketo data. Create or utilise existing groups based on dropdown and checkbox selections, ensuring precise targeting.
To access this feature, please contact your account manager to have it enabled.
Part 1: Setting Up your App Connection with Marketo #
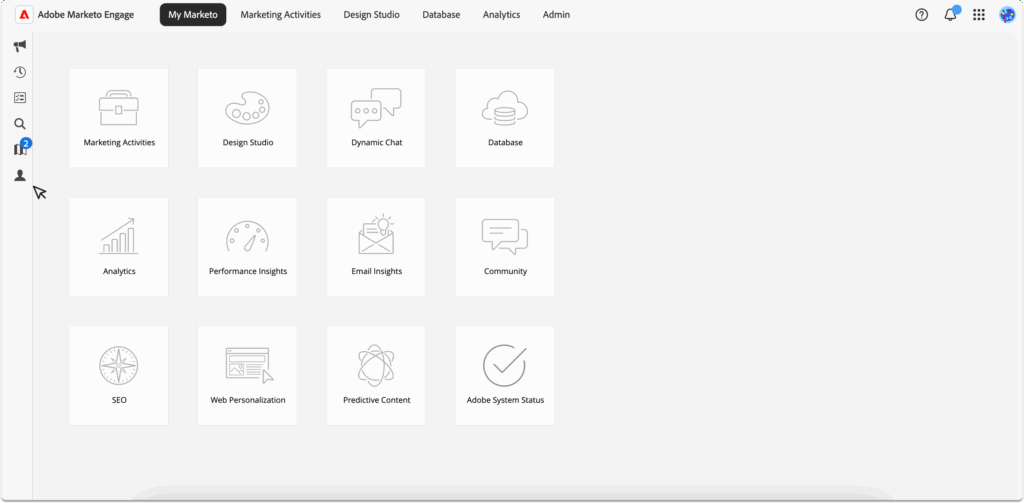
- Begin by logging in to Marketo and navigating to the instance you wish to integrate and select launch.
- On the left side menu, select the Person Icon as shown in the image above, this will open up the Admin menu. Within the Admin sub menu, select Users & Roles. Here we will need to create an API-Only user for the CrowdComms CMS integration.
- Select Create API Only User on the top navigation menu.

4. Enter the user’s name and email address into the on-screen form. You must assign at least one API permission.
5. Once the form is complete, click Create.
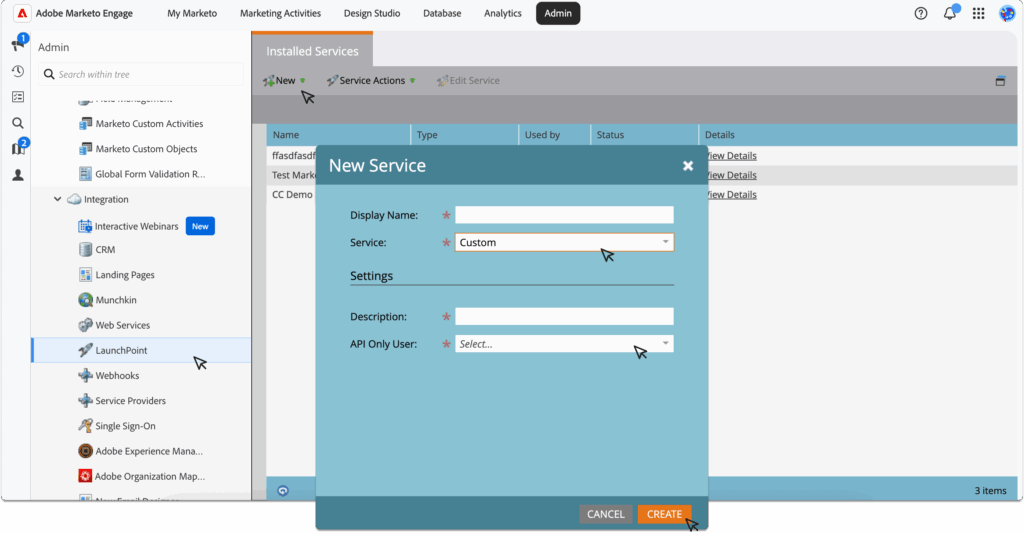
6. Navigate back to the left side menu and select Launch Points. In the Installed Services tab, select the New+ button to create a new service.
7. Set the display name for the integration service. From the drop-down menu, select Custom. Enter an appropriate description, then choose the API Only User you created in steps 4–5 from the drop-down list. Finally, click Create.
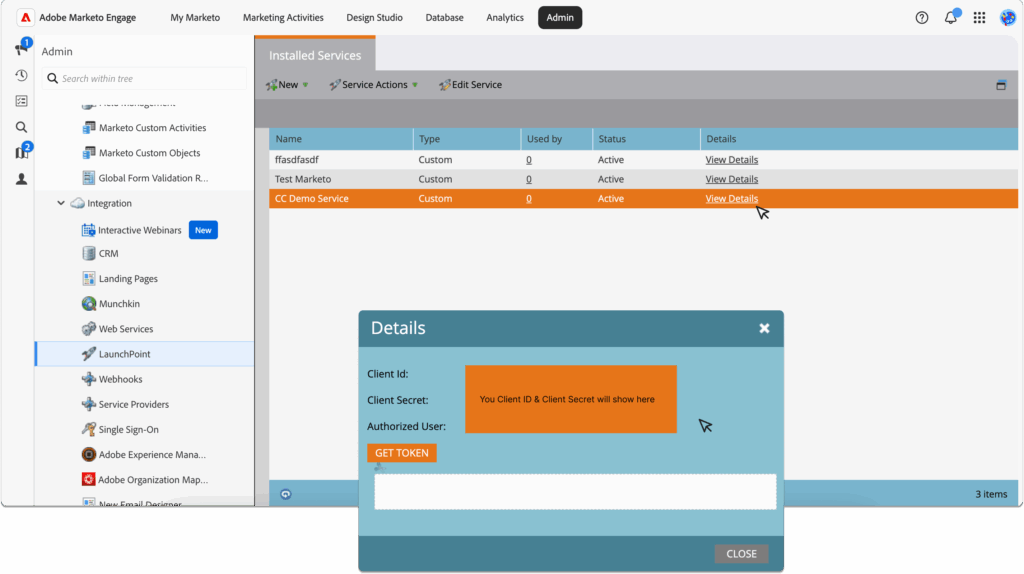
8. The new service you created will now appear in the table. Select View Details to continue. In the pop up modal take note of the Client ID and Client Secret, you will need these later in the CrowdComms CMS.
9. Next you will need to obtain your Program ID. On the top navigation menu, select the Marketing Activities tab. In the new left side menu under Active Marketing Programs select the appropiate program for your integration. For the purposes of this document, we have chosen ‘WebContent > Marketo Test’ as shown below. This will be different on your Marketo set up.
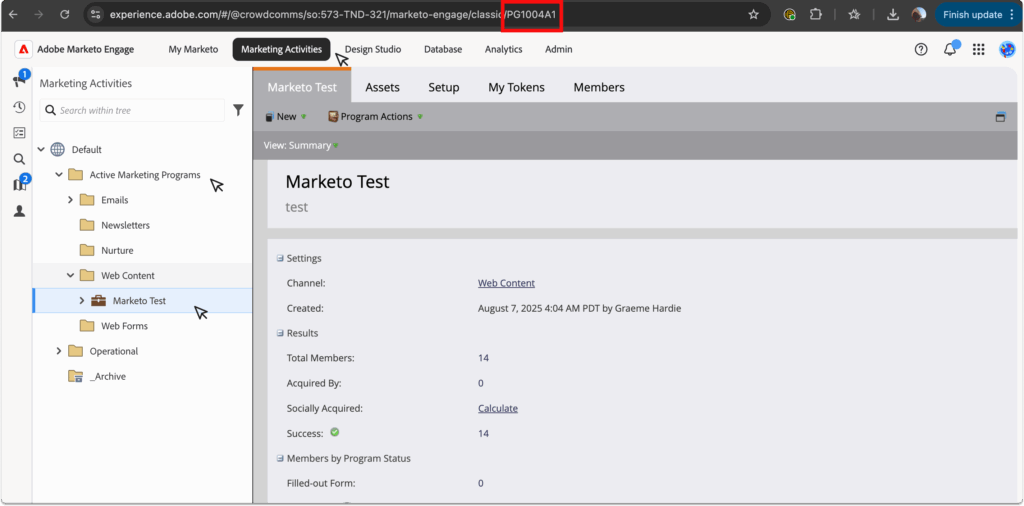
10. In the URL on this page, locate the number at the end that is prefixed with PG. Copy this number, excluding the last two digits – this is your Program ID. Make a note of it, as you will need it later in the CMS integration setup.
11. After you have made a note of your Program ID, you will need to obtain the Domain. The unique part of the domain is provided to you within your REST API endpoint. You can find this within the Web Services section of the Marketo dashboard.
12. Navigate back to the Admin menu by clicking the person icon in the left-hand menu. In the sub-menu, go to Integrations > Web Services.
In the right panel, scroll to the REST API section. In the Endpoint field, you’ll see a URL in the format:https://DOMAINHERE.mktorest.com/rest
Extract the domain that appears between https:// and .mktorest.com/rest. Make a note of this, as you will need it later in the CMS.

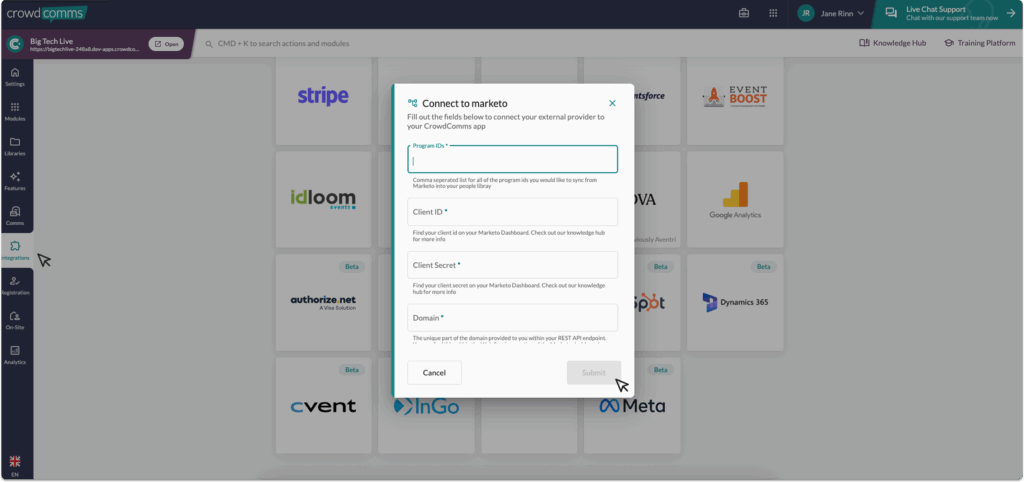
13. Now you can open up a new browser tab and log in to the CrowdComms CMS. Select your app you wish to integrate Marketo with, and within the App, navigate to the integrations tab using the left side menu. On the integrations page, select the Marketo tile.
14. A pop up modal will appear with a form requesting the Program ID, Client ID, Client Secret Key and the Domain we made a note of earlier. Paste these into your form and click Submit.
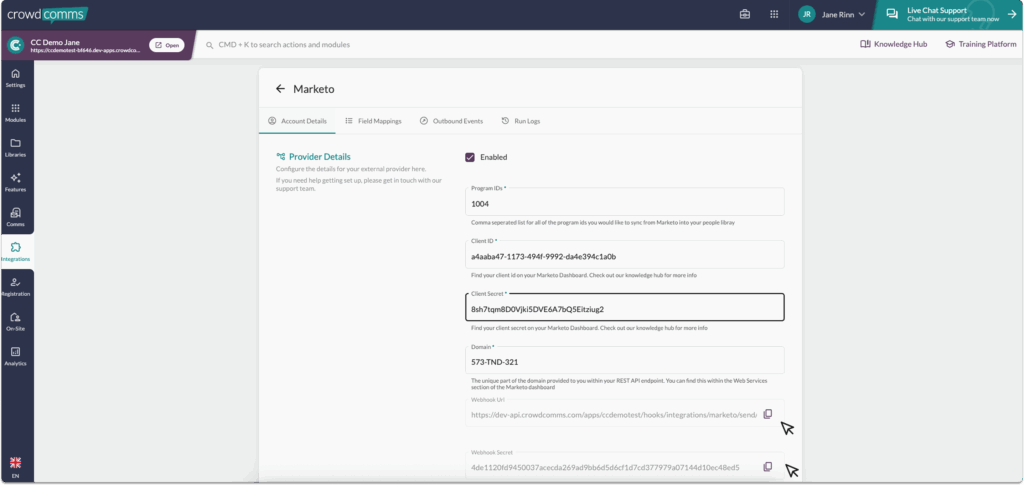
14. You will be navigated to the account details page, where you will see the CMS has generated a Webhook URL and Webhook Secret Key.
15. We will need to set up a Webhook in Marketo using these details to allow Marketo to send the data to the CMS.
16. Navigate back to your Marketo browser window, and go to the Admin menu. Within the submenu, select Integrations > Webhooks. In the Webhooks window select: New Webhook+.
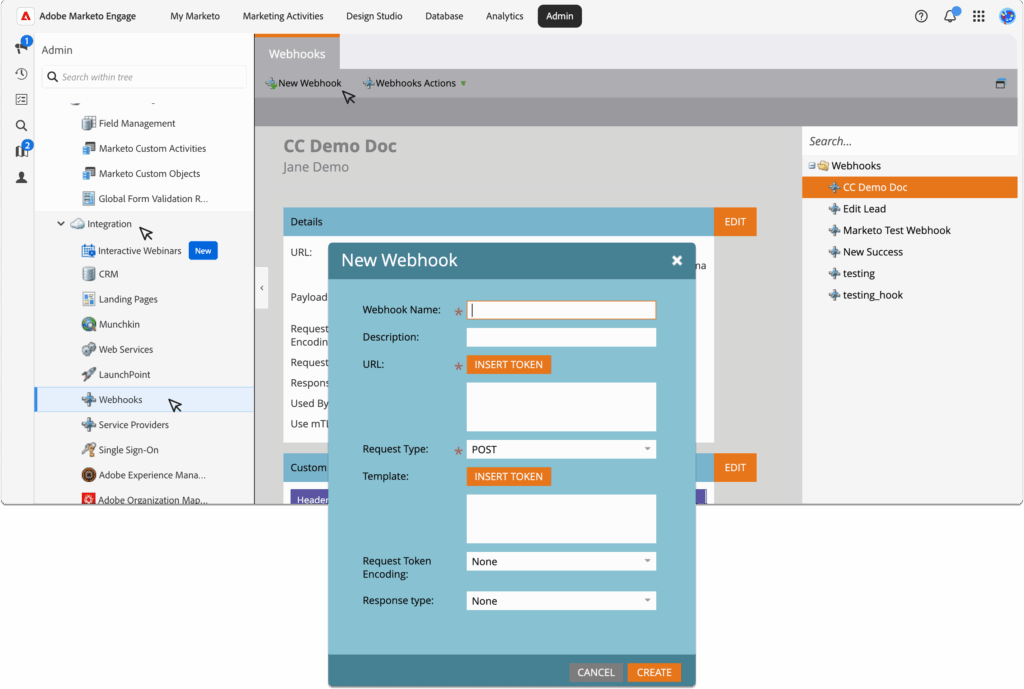
17. In the pop up modal form, set a webhook name and description. Copy the Webhook URL from the CrowdComms CMS to the Marketo URL text field. Set the request type to POST. Set your template format, ensure the Lead ID key is encluded then click Create.
Template example:
{
“id”: {{lead.Id}},
“email”: {{lead.Email Address}},
“firstName”: {{lead.First Name}},
“lastName”: {{lead.Last Name}}
}
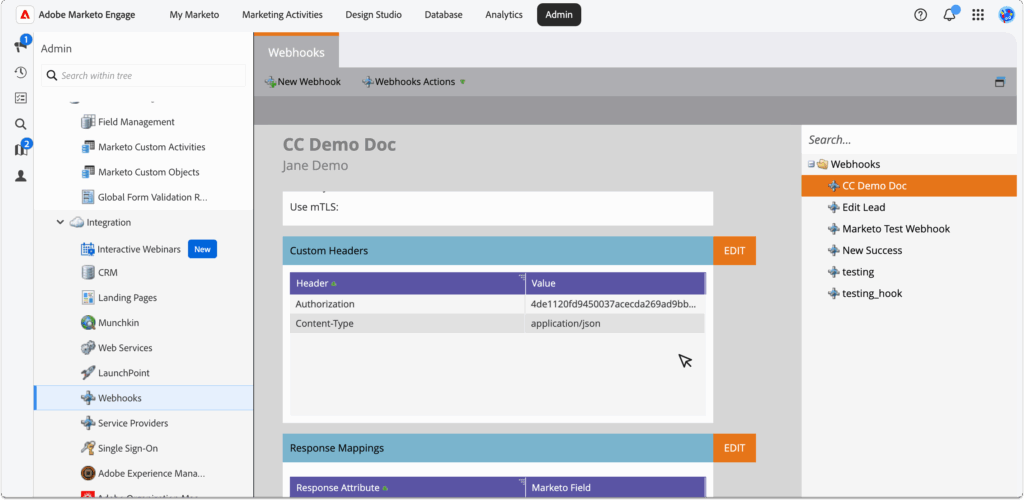
18. After creating the webhook, scroll down within the webhook window to the Headers section and click Edit.
19. You will need to set two headers as follows:
- Header : Content Type
Value: application/json - Header: Authorization
Value: Enter the Webhook Secret here copied from the CMS
Once they are set, click Save.
Part 2: Configuring your Field Mappings #
You are now ready to begin mapping your fields between Marketo and the CMS.
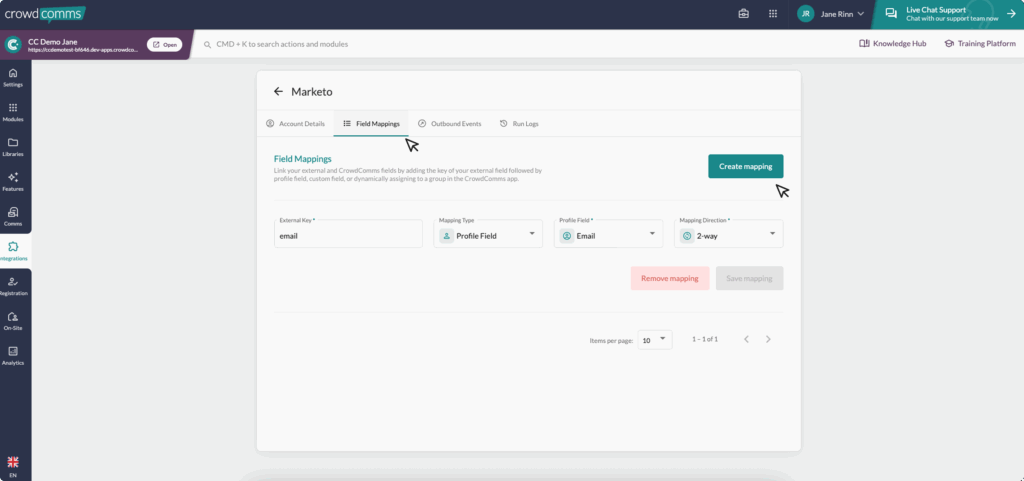
- Navigate to the Crowd Comms CMS browser again, to the Field Mappings tab, and select Create Mapping.
- In the dialogue, enter the Marketo Field Key into the External Key input box.
- Select the Mapping Type from the dropdown menu. You can choose from:
- Profile Field: Fname, Lname, Suffix, Email, Phone, Title, Job Title, Company, Address, Location, Website, About.
- Custom Field: These will be Custom Fields already created in the CMS. For more information on Custom Fields, please see here.
- Dynamic Group: This field will be mapped to an existing group, if a group does not exist, one will be created.
Next you can set the Mapping Direction from the drop down. You can choose from:
- Outbound: Send data from CrowdComms to your external provider.
- Inbound: Send data to CrowdComms from your external provider.
- 2way: Keep data in sync between CrowdComms and your external provider.
- Symbolic: Link a person from CrowdComms to your external provider without sending data.
Please ensure you map an email field between Marketo and the CMS, as this will work as the unique identifier for each delegate’s information. The integration will not run without an email mapping field.
5. Continue to map out your fields until you are satisfied, these will autosave as you progress.
6. To activate the sync to automatically begin to run: navigate to the account details tab and select the check box to enable the integration, and Save Changes. The integration will fail to run if you have entered an External Key that does not exist in Marketo. Syncs should happen at intervals of 3 hours on a predetermined schedule.
Part 3: Outbound Events #
Outbound Event Mappings link events that occur in the CrowdComms system to specific fields in your external platform. To enable syncing, an email field must be mapped.
- Navigate to the Outbound Events tab within the Integration page.
- Select the Create Mapping button.
- In the drop down, select from one of two event types:
Attendance Tracked: Update a field in your external provider when a delegate checks in to a session.
Badge Printed: Update a field in your external provider when a delegate prints a badge
- Enter the External ID captured from your external CRM. Select the External Field Type, this will be what is entered into the External CRM you can choose between:
- A Boolean: Writes True or False to Salesforce.
- Date Time: Writes the date/time of the event.
- Please note you will need to have Kiosks or Attendance Tracking enabled to use this feature. Please speak to your event manager to set this up.
- To activate the sync to automatically begin to run, navigate to the account details tab, and select the check box to enable the integration, and Save Changes. The integration will fail to run if you have entered an External Key that does not exist in the external CRM. Syncs should happen at intervals of 3 hours on a predetermined schedule.
Run Logs #
Run Logs are available in the CMS under your integration’s configuration settings. To access them, go to the Integrations tab in the left-hand menu, select your integration, and if it’s set up, you’ll be able to navigate to Run Logs.
The Run Logs will show you information on the latest sync of the integration. You can view how many entities were created, how many entities were updated, and the time and date of each sync or ‘run’ of your integrations.
Please Note #
- Outbound Sync: Newly created Registrants/People in CrowdComms that do not already exist in Marketo will be created as leads within Marketo. You will need to configure a smart program or flow in Marketo to connect/assign these to a program.
- If a webhooks template has been incorrectly configured or any other issue occurs during the sync via the webhook; either send the webhook again at a later time or disable and re enable the integration to perform another sync. Note: This will override any changes in the CrowdComms people library by performing a full sync of the programs you have provided. It’s best to run this only after the outbound sync has completed.
Should you need any assistance with this integration, please don’t hesitate to reach out to a member of the support team on Live Chat available via the CMS.


