Overview #
Effortlessly connect your event data from the CrowdComms CMS to WaveCast with our integration tool.
Now in Beta, this integration enables smooth, automatic synchronisation between platforms, eliminating the need for manual data entry. By linking your WaveCast Events, you can streamline attendee and registrant management, keeping your records accurate and up-to-date across both systems.
Key Capabilities Include:
- Effortless Connection: Easily link your WaveCast account with our CMS through a dedicated integration tile, featuring a streamlined setup process.
- Customised Data Mapping: Tailor the integration to your specific needs by mapping WaveCast field keys to profile fields, custom fields, or dynamic groups within our CMS.
- Dynamic Group Management: Leverage the power of dynamic groups to automatically segment your audience based on WaveCast data. Create or utilise existing groups based on dropdown and checkbox selections, ensuring precise targeting.
To access this feature, please contact your Account Manager to have it enabled
WaveCast Configurations #
Before you can connect your event to CrowdComms, you will need a few pre-requisites from WaveCast:
- Event I.D
- API Key
- Hub ID
The Event ID can be found in your WaveCast Dashboard. To obtain the other two required fields, please contact WaveCast Support for assistance.
How to Configure Your WaveCast Integration in the CMS #
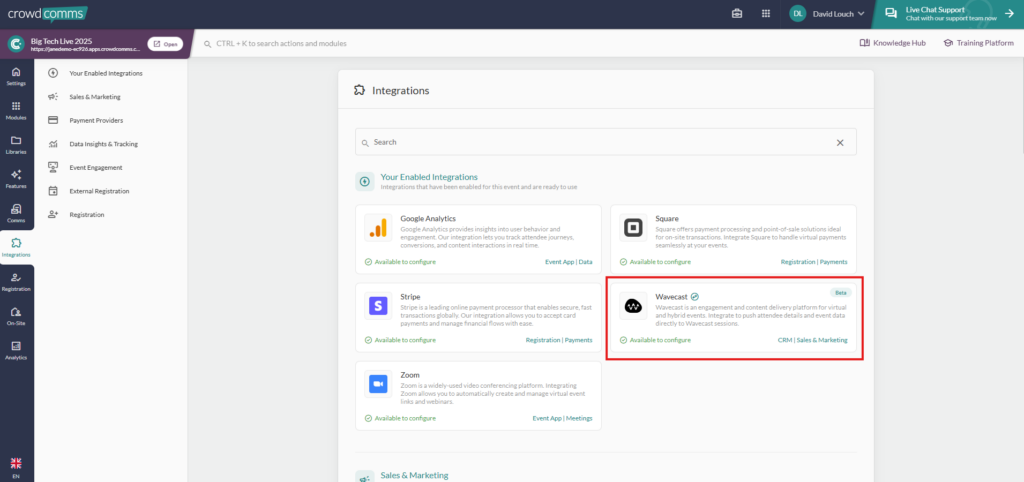
- Navigate to the CMS and select your event App. Within the app, navigate to the left side menu, and select the Integrations tab. Within the Integrations page, select the WaveCast- beta tile or use the search function to find it.
- If the integration is not listed, please contact support to request this is activated for you.
- In the pop-up modal, fill in the form with the details we retrieved from WaveCast:
- Event I.D.
- API Key
- Hub ID
- Once you have filled in those details, click Submit, and you will be navigated to the Account Details page for your integration.
- ⚠️Important: Do not check the box to enable the integration just yet.
Configuring Your Field Mappings #
You are now ready to begin mapping your fields between WaveCast and the CMS:
- Navigate to the CrowdComms CMS browser again, to the Field Mappings tab, and select: Create Mapping.
- In the dialogue, enter the WaveCast FieldKey/Object Id into the External Key input box. The External Key corresponds to the Object ID of the Contact Table in WaveCast. This value is case-sensitive, and must match exactly what is configured in WaveCast for the integration to run. Otherwise, the integration will fail to run as it will be unable to find the field/object you wish to pull into CrowdComms.
- Select the Mapping Type from the dropdown menu. You can choose from:
- Profile Field: Fname, Lname, Suffix, Email, Phone, Title, Job Title, Company, Address, Location, Website, About.
- Custom Field: These will be Custom Fields already created in the CMS. For more information on Custom Fields, please see here.
- Dynamic Group: This field will be mapped to an existing group. If a group does not exist, one will be created.
- Next you can set the Mapping Direction from the drop down. Please note only inbound is currently supported.
- Outbound: Send data from CrowdComms to your external provider.
- Inbound: Send data to CrowdComms from your external provider.
- 2way: Keep data in sync between CrowdComms and your external provider.
- Symbolic: Link a person from CrowdComms to your external provider without sending data Please ensure you map an email field between WaveCast and the CMS, as this will work as the unique identifier for each delegate’s information. The integration will not run without an email mapping field.
Continue to map out your fields until you are satisfied, these will autosave as you progress.
To activate the sync so it runs automatically, go to the Account Details tab, select the checkbox to Enable the integration, and click Save Changes. The integration will fail if the External Key you entered does not exist in WaveCast. Once enabled, outbound syncs should run every 30 minutes on a predetermined schedule
Create Webhooks #
Webhooks allow any changes made in Wavecast to be reflected within the CrowdComms CMS in real time. Here’s how:
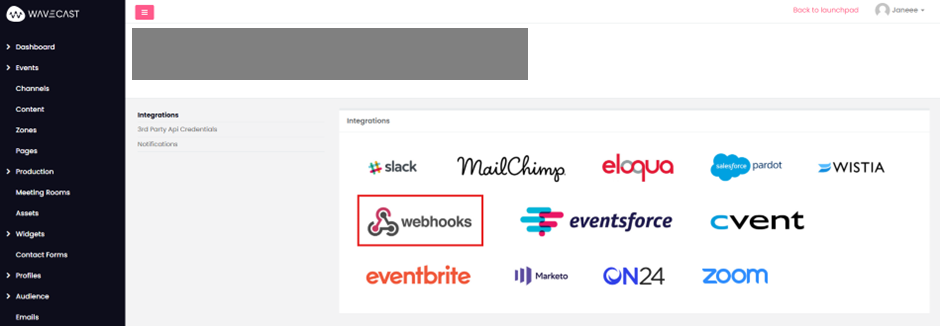
- Log in to Wavecast
- Scroll to the bottom of the left hand menu and select Settings, and then Integrations
- On the Integrations page, click Webhooks
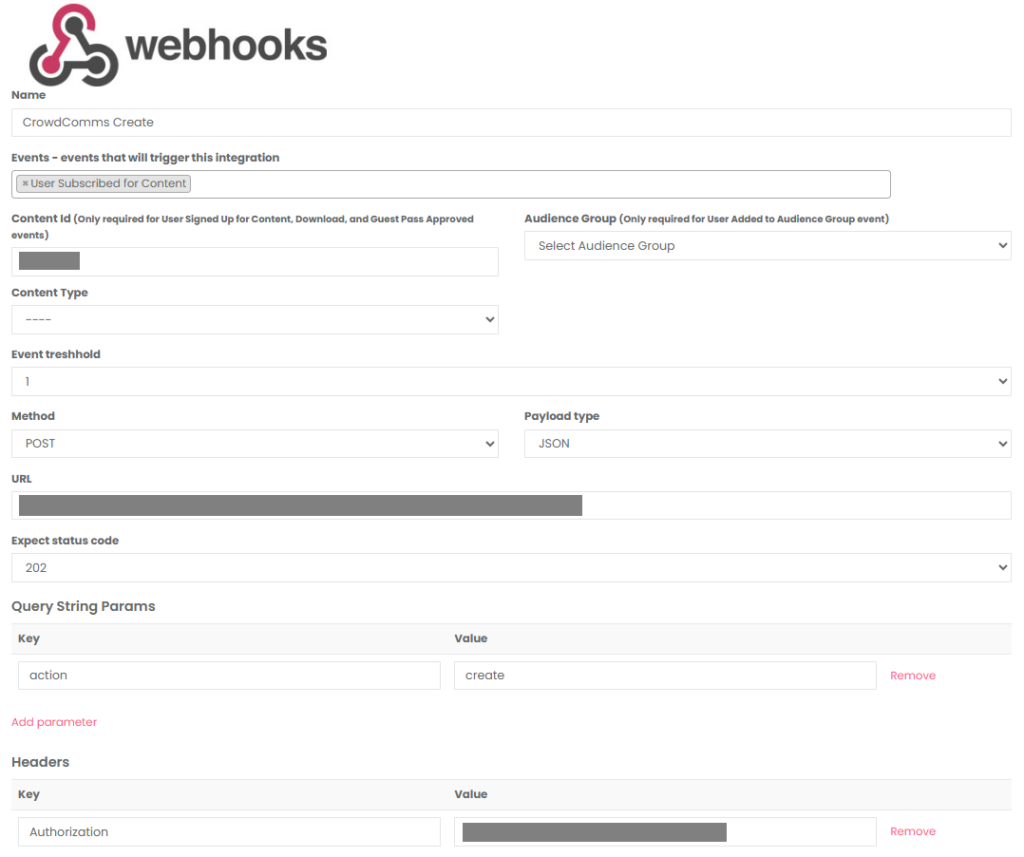
Complete the fields within the page as follows:
- Name
- This can be anything you like, but we suggest the following format: CC – Event Name – Create – so you can quickly see which event a hook is for and what action it is taking.
- Events
- For this webhook, choose User Subscribed for Content
- Content ID
- This is the Event ID for which this hook relates.
- Method
- Select POST
- Payload Type
- Select JSON
- URL
- This can be found within the Wavecast integration page in the CrowdComms CMS.
- Copy and paste this URL into the field.
- Expect status code
- Select 202
- Under Query String Params click Add parameter.
- Set Key and Value as action & create
- Under Headers click Add header.
- Set the Key as Authorization.
- For the Value, copy the Webhook Secret from the Wavecast integration page in the CrowdComms CMS.
Scroll down the page to the Map user fields section and complete as follows:
| Papillon field | 3rd party field name |
| User Id | user_id |
| First Name | first_name |
| Last Name | last_name |
| Job Title | job_title |
| Company | company |
| Country | country |
| Phone | phone |
| City | city |

At the bottom of the page click Create.
We can now duplicate this setup for Update and Delete methods.
From the Integrations screen, scroll down and duplicate the newly created webhook (you may need to scroll horizontally in the table to see the buttons).

Give the duplicated integration a new name e.g. CC – Event Name – Update
- Events
- Remove the existing value and choose User Profile Updated
- Query String Params
- Change Value to update
Leave everything else the same, scroll to the bottom of the page and click Update.
From the Integrations screen, scroll down and duplicate the first Create webhook once more (you may need to scroll horizontally in the table to see the buttons).
Give the duplicated integration a new name e.g. CC – Event Name – Delete
- Events
- Remove the existing value and choose User Cancelled Content Subscription
- Query String Params
- Change Value to delete
Leave everything else the same, scroll to the bottom of the page and click Update.
You have now set up the Webhooks for your event! 🎉
Run Logs #
Run Logs are available in the CMS under your integration’s configuration settings. To access them, go to the Integrations tab in the left-hand menu. Select your integration, and if it’s set up, you’ll be able to navigate to Run Logs.
The Run Logs will show you information on the latest sync of the integration. You can view how many entities were created, how many entities were updated, and the time and date of each sync or ‘run’ of your integrations.
Please Note #
- This integration should only be used on smaller events with less than 300 people, if your event is larger, please contact your account manager.
Should you need any assistance with this integration, please don’t hesitate to reach out to a member of the support team on Live Chat available via the CMS.


